In this blog post we will demonstrate how to make a website using ASP.NET Core and Razor page and display data Razor web.
Prerequisites for the Web Application Developers
- Should have knowledge of C#
- Should have knowledge of HTML
- Should have knowledge of Visual Studio
Develop Web Application in ASP.NET Core using Razor Page
Getting StartedIt is easier to create a web application in ASP.NET Core using Razor Page as compared to ASP.NET Core MVC. In web-based development, page-focused coding and productivity can be achieved with Razor Page.
DemonstrationThe following points we well cover here in the demonstration. The web app development is conducted in Visual Studio 2022 and .Net Framework 8.0.
- Make a website template in ASP.NET Core
- Overview of project folders and files.
- Overview of Program.cs file .
- Create a web page using Razor page.
Follow the below instructions to develop a web application template.
- Open the Visual Studio and click on the Create a new project.
- The Create a new project window will appear.
- Find the ASP.NET Core Web App (Razor Page) template.
- Select the template and click on the Next button.
- Then Configure your new project window will appear.
- Give the name RazorWeb to your project.
- Click on the Next button.
- Additional information windows will be displayed.
- Select .Net 8.0 as framework.
- Uncheck the Do not use top-level statements if checked.
- Click on the Create button.
- You are done with ASP.NET Core Web APP template.
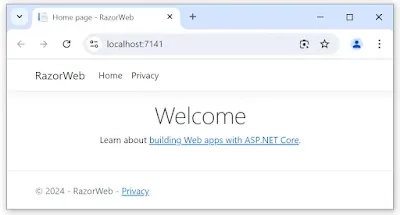
Runn the project without the debugger by pressing Ctr+F5, you will have a web app like below image.
 |
Develop Web Application |
Go to the solution explorer, you will find the following started project is created given in the image. Here we will know about the main project folders and files which we application developers should know about before going ahead.
 |
Website Development Files |
- Page Folder: Page folder contains Razor pages and supporting folders or files.
- Each supporting file has a name with underscore as prefix for example _layout.cshtml.
- Each razor page contains following two file
- A .cshtml file which contains HTML markup and C# code followed by razor syntax.
- A .cshtml.cs file contains C# code to handle page events
- wwwroot Folder: contains static files like CSS, JavaScript and html files.
- appsettings.json: contains data configuration like environment variables, database settings etc.
- Program.cs file: This is the first file whose code will execute first when web application starts.
In .Net core every app whether in web-based development app or desktop or console app runs from the Program.cs file. It contains codes here for creating instance of web application builder with preconfigured by default. It also contains configuration of services, enable middlewares then runs the app.
The program file contains the following code.
1:  var builder = WebApplication.CreateBuilder(args);
2:  // Add services to the container.
3:  builder.Services.AddRazorPages();
4:  var app = builder.Build();
5:  // Configure the HTTP request pipeline.
6:  if (!app.Environment.IsDevelopment())
7:  {
8:    app.UseExceptionHandler("/Error");
9:    // The default HSTS value is 30 days. You may want to change this for production scenarios, see https://aka.ms/aspnetcore-hsts.
10:    app.UseHsts();
11:  }
12:  app.UseHttpsRedirection();
13:  app.UseStaticFiles();
14:  app.UseRouting();
15:  app.UseAuthorization();
16:  app.MapRazorPages();
17:  app.Run();
In the above code the line [1] creates a web application builder with default configuration. Iine [3] adds Razor Pages support to the dependency Injection container and line[4] builds the app.
Code from line[12] to[16] enables following Middlewares:
- app.UseHttpsRedirection(); : Redirects HTTP requests to HTTPS.
- app.UseStaticFiles();: Enables static files, such as HTML, CSS, images, and JavaScript to be served. For more information.
- app.UseRouting(); : Adds route matching to the middleware pipeline. For more information.
- app.MapRazorPages();: Configures endpoint routing for Razor Pages.
- app.UseAuthorization(); : Authorizes a user to access secure resources. This app doesn't use authorization, therefore this line could be removed.
Finally, the code in line [17] runs the ASP.NET Razor app.
Create a web page using Razor page.
Follow the below steps to add Razor page in web application.
- Go to Solution Explorer
- Right-click on the Pages folder > Add > New Folder.
- Name the folder HelloWorld.
- Right-click on the Pages/HelloWorld>Add>New Scaffolded Item.
- The Add New Scaffolded Item window will appear, in the dialog
- Select Razor Page-Empty.
- Click on the Add button.
- Give the name to the page index.cshtml
- You will find two files are generated inside the HelloWorld folder. To know more about these files, go to the folder and file overview section.
- Open the index.cshtml file by double clicking on it then remove all the code
- Copy the below code and past it in index.cshtml file.
 @page
 @model RazorWeb.Pages.HelloWorld.IndexModel
 @{
   <h3><u>Employee Names</u></h3>
   <ol type="1">
     @foreach (var emp in Model.Employees)
     {
       <li>
         @Html.DisplayFor(modelItem => emp)
       </li>
     }
   </ol>
 }
ASP.NET Razor Page Web App Development
- Then ope the index.cshtml.cs file and copy the below code and replace it
 using Microsoft.AspNetCore.Mvc;
 using Microsoft.AspNetCore.Mvc.RazorPages;
 namespace RazorWeb.Pages.HelloWorld
 {
   public class IndexModel : PageModel
   {
     public List<string> Employees { get; set; }
     public void OnGet()
     {
       Employees = new List<string>();
       Employees.Add("Raguveer");
       Employees.Add("Rajeev");
       Employees.Add("Ramakant");
       Employees.Add("Geeta");
       Employees.Add("Neeva");
     }
   }
 }
Website Development with ASP.NET Razor Page
- Run the web application project, the home page will appear on browser with URL followed by this pattenr {protocol}://{localhost}:{port}/
- In my web app development, i got port number 7141 as default. Hence the URL for me is https://localhost:7141/
- Add HelloWorld in the link . After adding the HelloWorld in the link, the URL will be https://localhost:7141/HelloWorld
- Then press the Enter key. you will be redirected to the below index page of HelloWorld which you have created using Razor page.

ASP.NET Razor Page
Here in this blog post, we learned how to develop a web application in ASP.NET Core using Razore page. I hope it is helpful and you have enjoyed it.
Thanks
